
Work Text:
This tutorial will show you how to create blurry text on AO3.
Maybe your POV character is tuning someone out and you want their dialogue to fade away into nothing.
Maybe you want to trick your readers into thinking they are having vision problems.
Whatever the reason, this tutorial will help you accomplish it.
STEP 1: Create a workskin
a. Click "skins"

b. Click 'My Work Skins'

c. Click 'Create Work Skin'

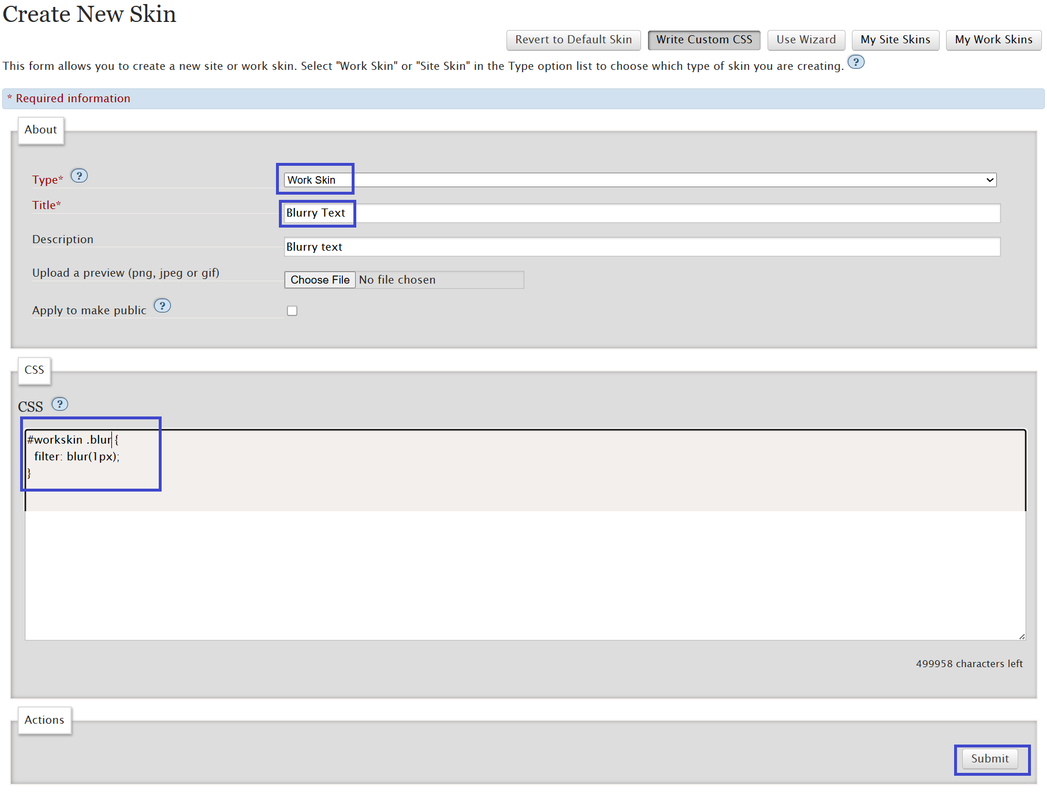
d. Fill in the mandatory fields. Under type, choose 'Work Skin'. Give your workskin a name (I called mine "Blurry Text"). Paste the following text into the CSS field:
#workskin .blur {
  filter: blur(1px);
}
Click 'submit'.
STEP 2: Apply the workskin to your work
Now you're ready to apply your workskin to a work.
Fill in all the fields you normally would when posting a fic. Just under 'Choose a language' you will find the field 'Select work skin'. Choose the new workskin you just created.

STEP 3: Indicate which text to blur
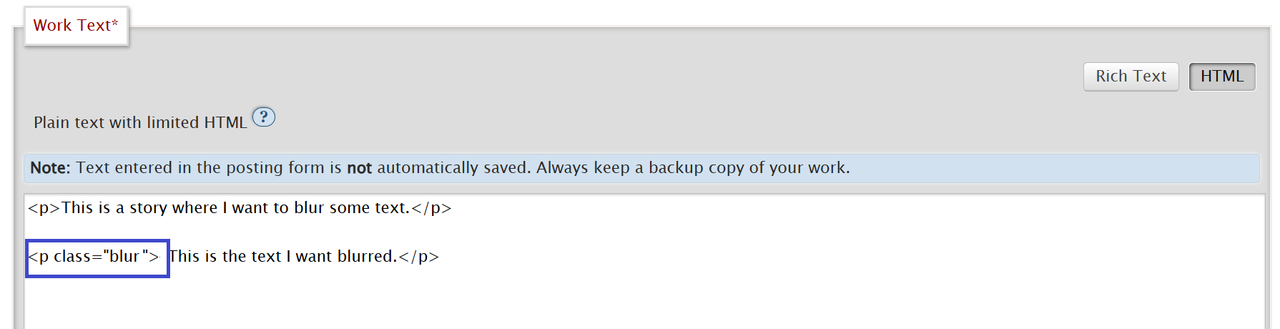
a. Under work text, paste your content, then click 'HTML'. You will see the html code, including paragraph tags.
Inside a paragraph tag, paste:
class="blur"
b. Click 'preview'

c. Your preview should look like this:

STEP 4: Make the text more or less blurry
The text above is blurry, but still legible. What if you want to make it more blurry?
Simply return to your workskin and change the number of pixels to blur.
#workskin .blur {
filter: blur(3px);
}
Now return to your work and click 'Preview' again, and now it should look like this:
This text is significantly blurrier.
It's worth noting that even though the text above is not particularly legible, determined readers can still copy and paste it into a text editor and they will be able to read it.
STEP 5: In-line transitions
But what if I don't want the whole paragraph to be blurry?
No problem. You can use other tags to apply the 'blur' effect. Instead of putting
class="blur"
in the <p> paragraph tag, you can put it in any other tag. I like to use the <span> tag. You can put multiple <span> tags within a paragraph tag. Make sure you close each <span> tag with a matching </span> tag.
Try this:
<p>This text is not blurry. <span class="blur">This text is blurry.</span> This text is not blurry. <span class="blur">This text is blurry again.</span></p>
This text is not blurry. This text is blurry. This text is not blurry. This text is blurry again.
STEP 6: Changing between blurriness levels
What if you want to have different blurriness levels in the same document?
For that, we have to head back to our workskin again. Instead of just changing the pixel value, we're going to create several options in the workskin that we can switch between. Edit your workskin to look like this:
#workskin .blur1 {
  filter: blur(1px);
}

#workskin .blur2 {
  filter: blur(2px);
}

#workskin .blur3 {
  filter: blur(3px);
}

#workskin .blur4 {
  filter: blur(4px);
}

#workskin .blur5 {
  filter: blur(5px);
}
Then return to your document and try this:
<p><span class="blur1">This text</span> <span class="blur2">is slowly</span> <span class="blur3">disappearing</span> <span class="blur4">as it gets</span> <span class="blur5">blurier and blurier.</span></p>
This text is slowly disappearing as it gets blurier and blurier.
At this point, you should be able to freely change the blurriness of your text.
This concludes the tutorial.